Oven-Baked Parmesan Onion Ring Chips Recipe
Introduction
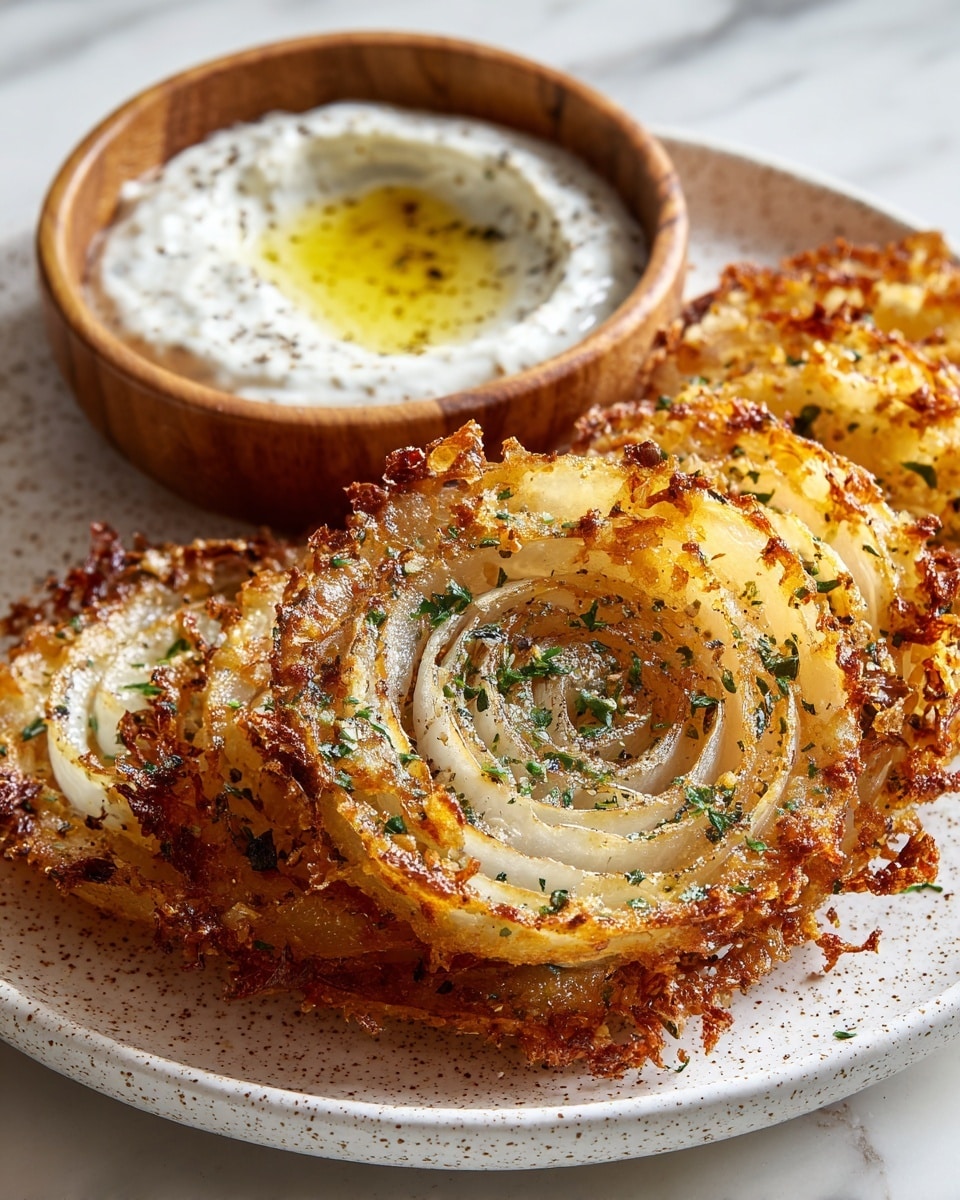
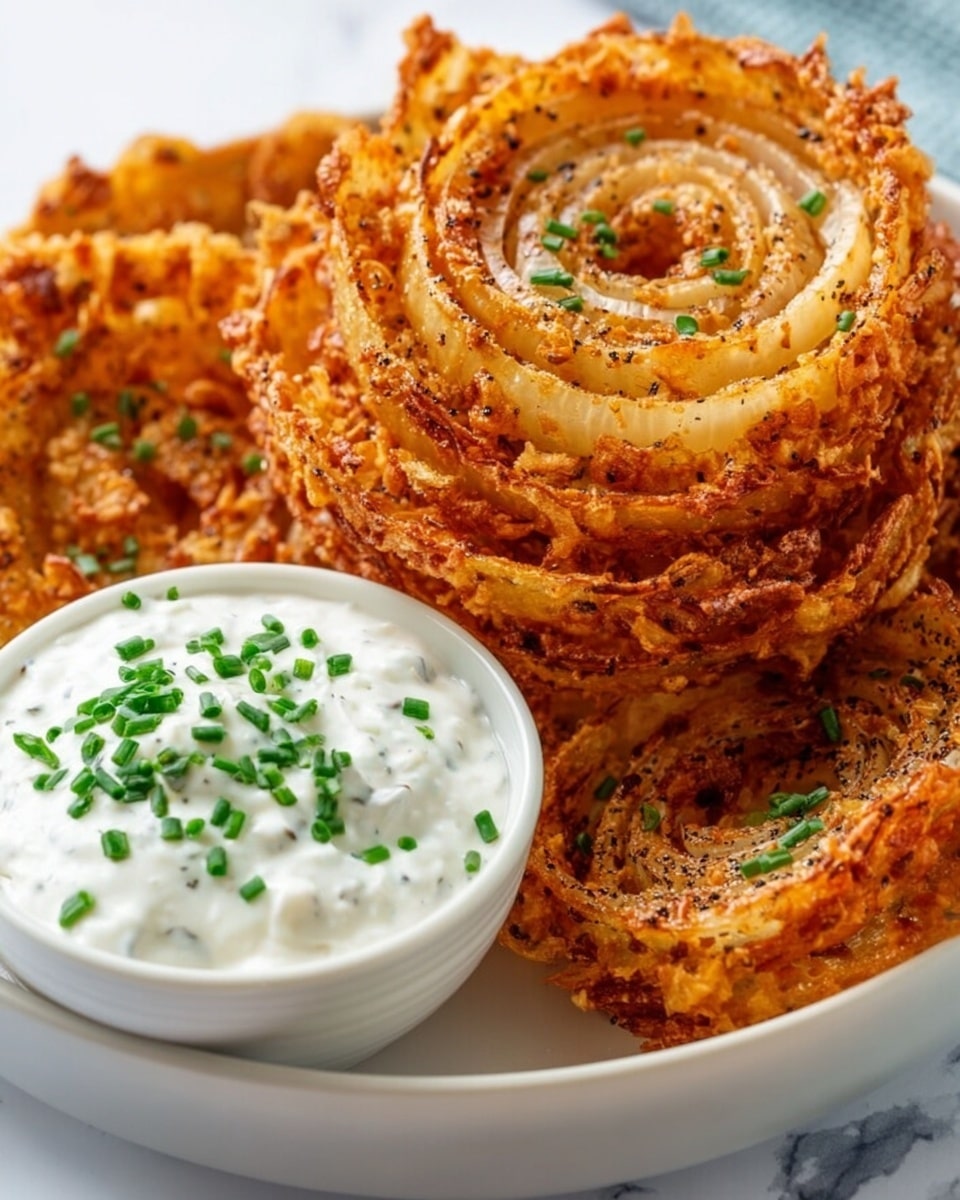
These Onion Rings Chips are a crispy, cheesy twist on a classic favorite. Made with sweet onion slices and baked parmesan, they deliver a crunchy snack that’s perfect for sharing or enjoying solo.
Ingredients
- 1 large sweet onion, sliced into 1/4-inch rings
- 1 cup freshly shredded parmesan cheese
- 1 teaspoon garlic powder
- 1 teaspoon smoked paprika
- 1/2 teaspoon black pepper
- Cooking spray or olive oil
- Optional: fresh chopped chives or parsley for garnish
Instructions
- Step 1: Preheat the oven to 400°F and line a baking sheet with parchment paper.
- Step 2: On the parchment paper, create small cheese mounds roughly the size of each onion slice using the shredded parmesan.
- Step 3: Place an onion ring over each cheese mound and gently press down so the onion sticks to the cheese.
- Step 4: Lightly mist each ring with cooking spray or brush with olive oil. Sprinkle evenly with garlic powder, smoked paprika, and black pepper.
- Step 5: Bake for 15–18 minutes, or until the edges are crispy and the cheese has turned a golden brown.
- Step 6: Allow the chips to cool on the baking sheet for 10 minutes before carefully removing them. Garnish with chopped chives or parsley if desired, and serve with your favorite dip.
Tips & Variations
- Use a sharp knife or mandoline for uniform onion slices to ensure even baking and crispness.
- Try adding a pinch of cayenne pepper for a spicy kick.
- Swap parmesan for another hard cheese like pecorino for a different flavor profile.
- Serve with marinara or ranch dressing for dipping.
Storage
Store any leftover onion rings chips in an airtight container at room temperature for up to 2 days. Reheat briefly in a preheated oven at 350°F for 3–5 minutes to restore crispness. Avoid refrigerating as it can make them soggy.
How to Serve
Serve this delicious recipe with your favorite sides.
FAQs
Can I use regular yellow or white onions instead of sweet onions?
Yes, you can use any onion variety you prefer. Sweet onions provide a milder, sweeter flavor, but yellow or white onions will work well and offer a sharper taste.
Can I make these onion rings chips gluten-free?
Absolutely. This recipe is naturally gluten-free since it relies on cheese and onions without any breading. Just be sure the spices and any dips you serve are gluten-free.
PrintOven-Baked Parmesan Onion Ring Chips Recipe

Crispy and flavorful Onion Rings Chips made with sweet onion slices coated in a savory parmesan cheese crust infused with garlic powder, smoked paprika, and black pepper. These oven-baked chips offer a deliciously crispy snack or appetizer, garnished with fresh herbs for an extra touch of freshness.
- Prep Time: 10 minutes
- Cook Time: 18 minutes
- Total Time: 28 minutes
- Yield: Approximately 12–15 onion rings chips 1x
- Category: Snack
- Method: Baking
- Cuisine: American
- Diet: Gluten Free
Ingredients
Main Ingredients
- 1 large sweet onion, sliced into 1/4-inch rings
- 1 cup freshly shredded parmesan cheese
- 1 teaspoon garlic powder
- 1 teaspoon smoked paprika
- 1/2 teaspoon black pepper
- Cooking spray or olive oil
Optional Garnish
- Fresh chopped chives or parsley
Instructions
- Preheat the oven: Preheat your oven to 400°F (205°C) and line a baking sheet with parchment paper to prevent sticking and make cleanup easier.
- Prepare the cheese base: On the prepared parchment paper, create small mounds of freshly shredded parmesan cheese roughly the size of each onion slice. This will act as the crispy base for the onion rings.
- Place onion rings on cheese: Take each sweet onion ring slice and set it gently on top of each cheese mound. Press lightly so the onion sticks to the cheese, ensuring the cheese will hold the chip together when baked.
- Season and oil: Lightly mist the assembled onion rings and cheese with cooking spray or brush with olive oil for better crisping. Then sprinkle each ring with garlic powder, smoked paprika, and black pepper for bold, smoky flavor.
- Bake until golden and crispy: Place the baking sheet in the oven and bake for 15–18 minutes, or until the cheese is golden brown and the edges are crispy. Keep an eye on them to avoid burning.
- Cool and garnish: Remove from the oven and allow the onion rings chips to cool on the baking sheet for 10 minutes. This resting time helps them firm up to a perfect crisp. Garnish with freshly chopped chives or parsley if desired and serve with your favorite dip.
Notes
- Use sweet onions for a milder, sweeter flavor that complements the parmesan cheese well.
- You can substitute parmesan with Pecorino Romano for a sharper taste.
- Adjust seasoning according to your taste preference or add other spices like cayenne for heat.
- Allow chips to cool completely for maximum crispness before serving.
- Store leftovers in an airtight container and reheat in the oven to restore crispiness.
Keywords: onion rings chips, baked onion rings, parmesan chips, crispy onion snack, gluten free snack, oven baked snack